ArangoDB v3.10 reached End of Life (EOL) and is no longer supported.
This documentation is outdated. Please see the most recent stable version.
Getting Started with ArangoGraphML
How to control all resources inside ArangoGraphML in a scriptable manner
ArangoGraphML provides an easy-to-use & scalable interface to run Graph Machine Learning on ArangoDB Data. Since all of the orchestration and ML logic is managed by ArangoGraph, all that is typically required are JSON specifications outlining individual processes to solve an ML Task. If you are using the self-managed solution, additional configurations may be required.
The arangoml is a Python Package allowing you to manage all of the necessary ArangoGraphML components, including:
- Project Management: Projects are a metadata-tracking entity that sit at the top level of ArangoGraphML. All activities must link to a project.
- Featurization: The step of converting human-understandable data to machine-understandable data (i.e features), such that it can be used to train Graph Neural Networks (GNNs).
- Training: Train a set of models based on the name of the generated/existing features, and a definition of the ML Task we want to solve (e.g Node Classification, Embedding Generation).
- Model Selection: Select the best model based on the metrics generated during training.
- Predictions: Generate predictions based on the selected model, and persit the results to the source graph (either in the source document, or in a new collection).
arangoml package.ArangoGraphML’s suite of services and packages is driven by “specifications”. These specifications are standard Python dictionaries that describe the task being performed, & the data being used. The ArangoGraphML services work closely together, with the previous task being used as the input for the next.
Let’s take a look at using the arangoml package to:
- Manage projects
- Featurize data
- Submit Training Jobs
- Evaluate Model Metrics
- Generate Predictions
Initialize ArangoML
API Documentation: arangoml.ArangoMLMagics.enable_arangoml
The arangoml package comes pre-loaded with every ArangoGraphML notebook environment.
To start using it, simply import it, and enable it via a Jupyter Magic Command.
arangoml = %enable_arangoml
API Documentation: arangoml.ArangoML
The ArangoML class is the main entry point for the arangoml package.
It requires the following parameters:
client: An instance of arango.client.ArangoClient. Defaults toNone. If not provided, the hosts argument must be provided.hosts: The ArangoDB host(s) to connect to. This can be a single host, or a list of hosts.username: The ArangoDB username to use for authentication.password: The ArangoDB password to use for authentication.user_token: The ArangoDB user token to use for authentication. This is an alternative to username/password authentication.ca_cert_file: (Optional) The path to the CA certificate file to use for TLS verification.user_token: (Optional) The ArangoDB user token to use for authentication. This is an alternative to username/password authentication.api_endpoint: The URL to the ArangoGraphML API Service.settings: (Optional) A list of secrets files to be loaded as settings. Parameters provided as arguments will override those in the settings files (e.gsettings.toml).version: The ArangoML API date version. Defaults to the latest version.
It is possible to instantiate an ArangoML object in multiple ways:
- Via parameters
from arangoml import ArangoML

arangoml = ArangoML(
    hosts="http://localhost:8529"
    username="root",
    password="password",
    # ca_cert_file="/path/to/ca.pem",
    # user_token="..."
    api_endpoint="http://localhost:8501",
)
- Via parameters and a custom
ArangoClientinstance
from arangoml import ArangoML
from arango import ArangoClient

client = ArangoClient(
    hosts="http://localhost:8529",
    verify_override="/path/to/ca.pem",
    hosts_resolver=...,
    ...
)

arangoml = ArangoML(
    client=client,
    username="root",
    password="password",
    # user_token="..."
    api_endpoint="http://localhost:8501",
)
- Via environment variables
import os
from arangoml import ArangoML

os.environ["ARANGODB_HOSTS"] = "http://localhost:8529"
os.environ["ARANGODB_CA_CERT_FILE"]="/path/to/ca.pem"
os.environ["ARANGODB_USER"] = "root"
os.environ["ARANGODB_PW"] = "password"
# os.environ["ARANGODB_USER_TOKEN"] = "..."
os.environ["ML_API_SERVICES_ENDPOINT"] = "http://localhost:8501"

arangoml = ArangoML()
- Via configuration files
import os
from arangoml import ArangoML

arangoml = ArangoML(settings_files=["settings_1.toml", "settings_2.toml"])
- Via a Jupyter Magic Command
API Documentation: arangoml.ArangoMLMagics.enable_arangoml
%load_ext arangoml
%enable_arangoml
%load_ext arangoml also provides access to other ArangoGraphML
Jupyter Magic Commands .Load the database
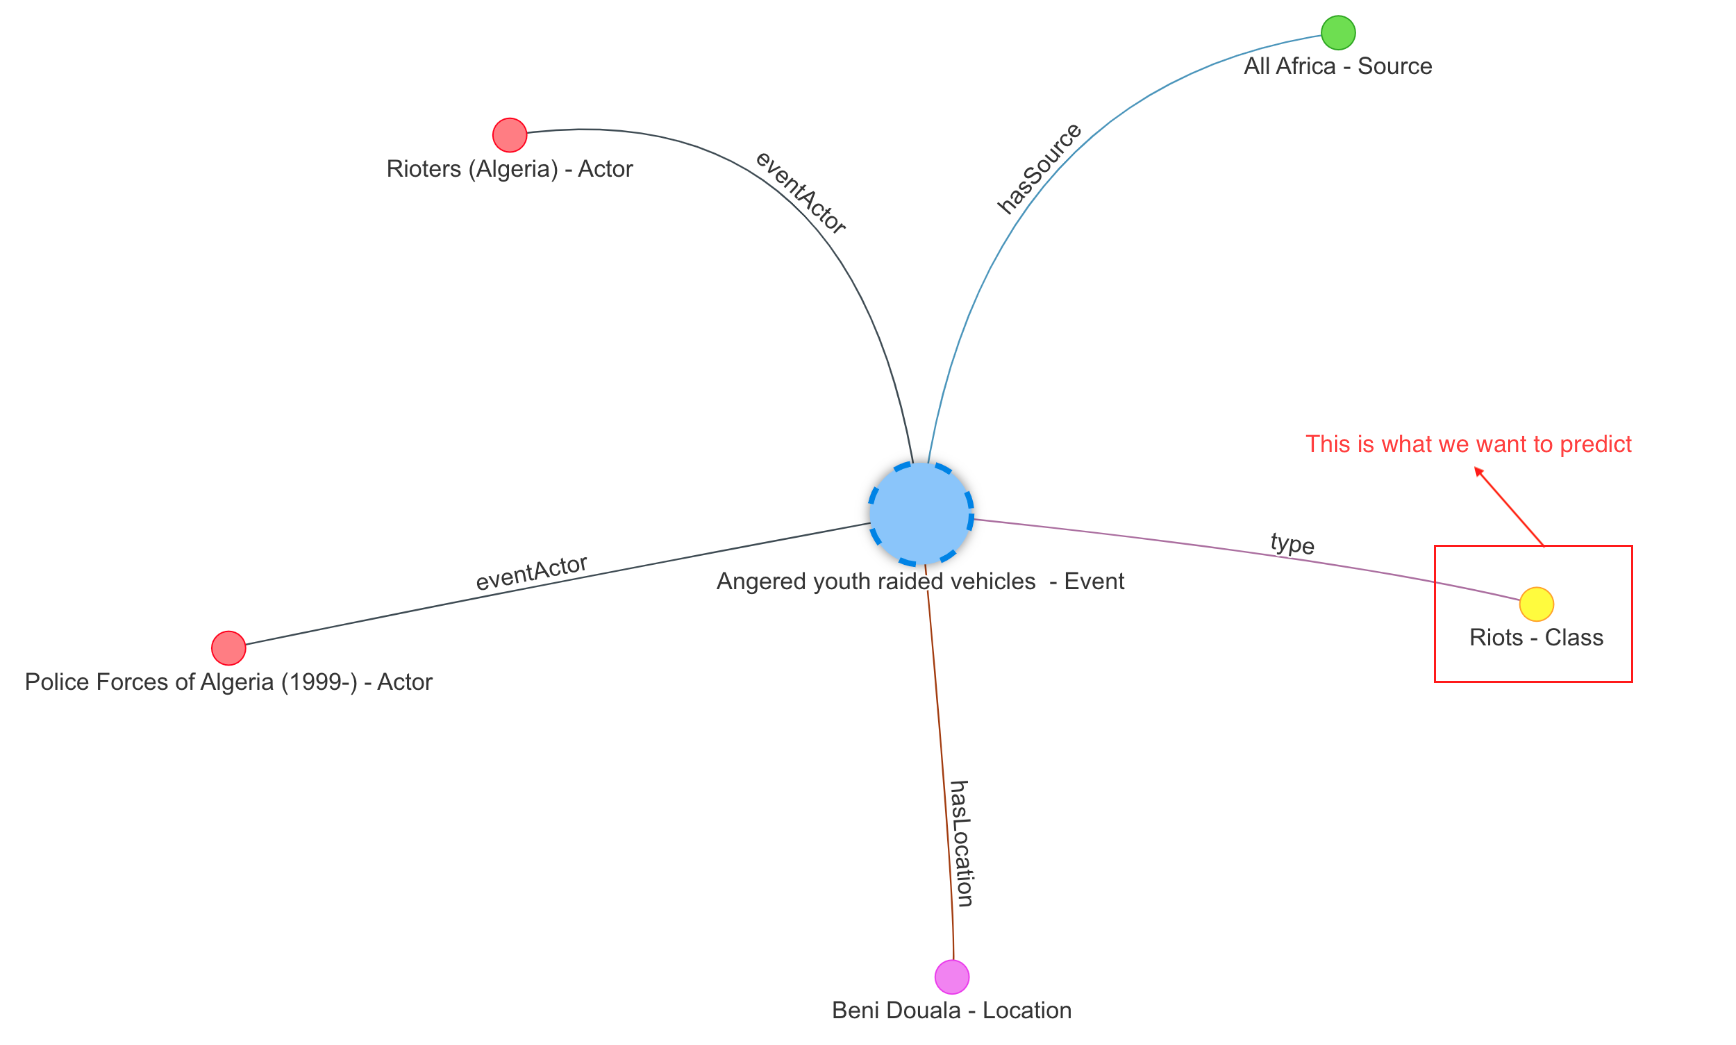
This example is using ArangoML to predict the class of Events in a
Knowledge Graph constructed from the GDELT Project .
GDELT monitors the world’s news media from nearly every corner of every country in print, broadcast, and web formats, in over 100 languages, every moment of every day. […] Put simply, the GDELT Project is a realtime open data global graph over human society as seen through the eyes of the world’s news media, reaching deeply into local events, reaction, discourse, and emotions of the most remote corners of the world in near-realtime and making all of this available as an open data firehose to enable research over human society.
The events used range from peaceful protests to significant battles in Angola. The image below depicts the connections around an example event:
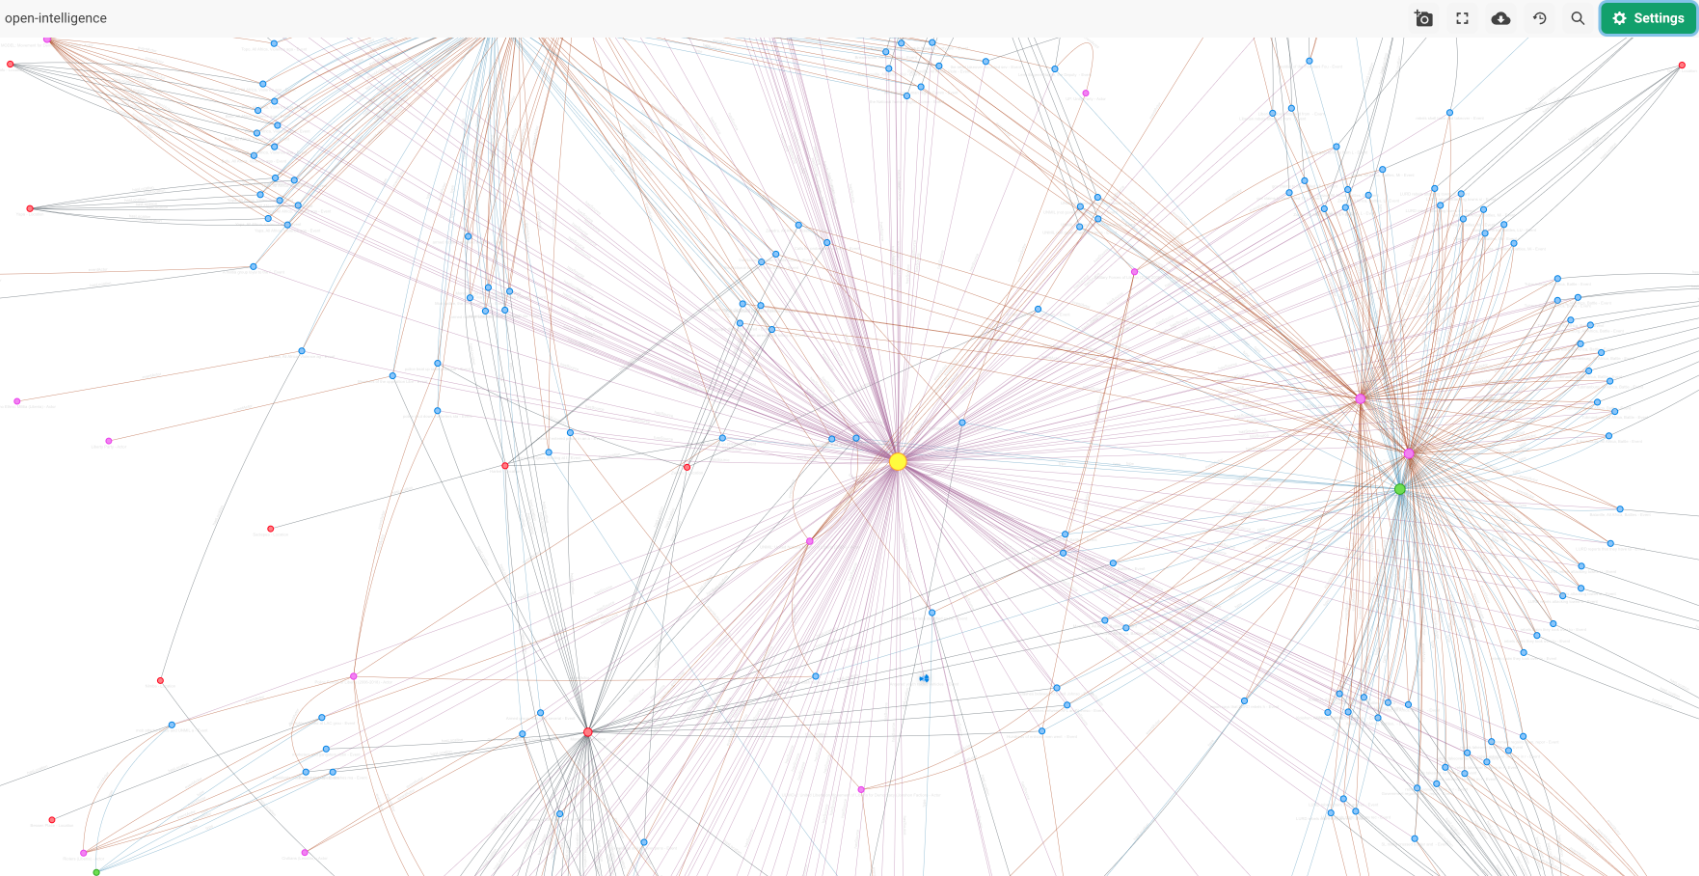
You can also see a larger portion of this graph, showing how the events, actors, news sources, and locations are interconnected into a large graph.
Let’s get started!
The arango-datasets package allows you to load pre-defined datasets into ArangoDB. It comes pre-installed in the ArangoGraphML notebook environment.
DATASET_NAME = "OPEN_INTELLIGENCE_ANGOLA"

%delete_database {DATASET_NAME}
%create_database {DATASET_NAME}
%use_database {DATASET_NAME}
%load_dataset {DATASET_NAME}
The arango-datasets package allows you to load a dataset into ArangoDB. It can be installed with:
pip install arango-datasets
from arango_datasets.datasets import Datasets

DATASET_NAME = "OPEN_INTELLIGENCE_ANGOLA"

db = arangoml.client.db(
    name=DATASET_NAME,
    username=arangoml.settings.get("ARANGODB_USER"),
    password=arangoml.settings.get("ARANGODB_PW"),
    user_token=arangoml.settings.get("ARANGODB_USER_TOKEN"),
    verify=True
)

Datasets(dataset_db).load(DATASET_NAME)
Projects
API Documentation: ArangoML.projects
Projects are an important reference used throughout the entire ArangoGraphML lifecycle. All activities link back to a project. The creation of the project is very simple.
Get/Create a project
project = arangoml.get_or_create_project(DATASET_NAME)
List projects
arangoml.projects.list_projects()
Featurization
API Documentation: ArangoML.jobs.featurize
The Featurization Service depends on a Featurization Specification that contains:
featurizationName: A name for the featurization task.projectName: The associated project name. You can useproject.namehere if it was created or retrieved as described above.graphName: The associated graph name that exists within the database.featureSetIDOptional: The ID of an existing Feature Set to re-use. If provided, themetagraphdictionary can be ommitted. Defaults toNone.featurizationConfigurationOptional: The optional default configuration to be applied across all features. Individual collection feature settings override this option.featurePrefix: The prefix to be applied to all individual features generated. Default isfeat_.outputName: Adjust the default feature name. This can be any valid ArangoDB attribute name. Defaults tox.dimensionalityReduction: Object configuring dimensionality reduction.disabled: Boolean for enabling or disabling dimensionality reduction. Default isfalse.size: The number of dimensions to reduce the feature length to. Default is512.
defaultsPerFeatureType: A dictionary mapping each feature to how missing or mismatched values should be handled. The keys of this dictionary are the features, and the values are sub-dictionaries with the following keys:missing: A sub-dictionary detailing how missing values should be handled.strategy: The strategy to use for missing values. Options includeREPLACEorRAISE.replacement: The value to replace missing values with. Only needed ifstrategyisREPLACE.
mismatch: A sub-dictionary detailing how mismatched values should be handled.strategy: The strategy to use for mismatched values. Options includeREPLACE,RAISE,COERCE_REPLACE, orCOERCE_RAISE.replacement: The value to replace mismatched values with. Only needed ifstrategyisREPLACE, orCOERCE_REPLACE.
jobConfigurationOptional: A set of configurations that are applied to the job.batchSize: The number of documents to process in a single batch. Default is32.runAnalysisChecks: Boolean for enabling or disabling analysis checks. Default istrue.skipLabels: Boolean for enabling or disabling label skipping. Default isfalse.overwriteFSGraph: Boolean for enabling or disabling overwriting the feature store graph. Default isfalse.writeToSourceGraph: Boolean for enabling or disabling writing features to the source graph. Default istrue.useFeatureStore: Boolean for enabling or disabling the use of the feature store. Default isfalse.
metagraph: Metadata to represent the vertex & edge collections of the graph.vertexCollections: A dictionary mapping the vertex collection names to the following values:features: A dictionary mapping document properties to the following values:featureType: The type of feature. Options includetext,category,numeric, orlabel.
config: Collection-level configuration settings.featurePrefix: Identical to globalfeaturePrefixbut for this collection.dimensionalityReduction: Identical to globaldimensionalityReductionbut for this collection.outputName: Identical to globaloutputNamebut for this collection.defaultsPerFeatureType: Identical to globaldefaultsPerFeatureTypebut for this collection.
edgeCollections: A dictionary mapping the edge collection names to an empty dictionary, as edge attributes are not currently supported.
The Featurization Specification example is used for the GDELT dataset:
- It featurizes the
nameattribute of theActor,Class,Country,Source,Location, andRegioncollections as atextfeatures. - It featurizes the
descriptionattribute of theEventcollection as atextfeature. - It featurizes the
labelattribute of theEventcollection as alabelfeature (this is the attribute you want to predict). - It featurizes the
sourceScaleattribute of theSourcecollection as acategoryfeature. - It featurizes the
nameattribute of theRegioncollection as acategoryfeature.
# 1. Define the Featurization Specification

featurization_spec = {
    "databaseName": dataset_db.name,
    "projectName": project.name,
    "graphName": graph.name,
    "featurizationName": f"{DATASET_NAME}_Featurization",
    "featurizationConfiguration": {
        "featurePrefix": "feat_",
        "dimensionalityReduction": { "size": 256 },
        "outputName": "x"
    },
    "jobConfiguration": {
        "batchSize": 512,
        "useFeatureStore": False,
        "runAnalysisChecks": False,
    },
    "metagraph": {
        "vertexCollections": {
            "Actor": {
                "features": {
                    "name": {
                        "featureType": "text",
                    },
                }
            },
            "Country": {
                "features": {
                    "name": {
                        "featureType": "text",
                    }
                }
            },
            "Event": {
                "features": {
                    "description": {
                        "featureType": "text",
                    },
                    "label": {
                        "featureType": "label",
                    },
                }
            },
            "Source": {
                "features": {
                    "name": {
                        "featureType": "text",
                    },
                    "sourceScale": {
                        "featureType": "category",
                    },
                }
            },
            "Location": {
                "features": {
                    "name": {
                        "featureType": "text",
                    }
                }
            },
            "Region": {
                "features": {
                    "name": {
                        "featureType": "category",
                    },
                }
            }
        },
        "edgeCollections": {
            "eventActor": {},
            "hasSource": {},
            "hasLocation": {},
            "inCountry": {},
            "inRegion": {},
        }
    }
}
Once the specification has been defined, a Featurization Job can be triggered using the arangoml.jobs.featurize method:
# 2. Submit a Featurization Job

featurization_job = arangoml.jobs.featurize(featurization_spec)
Once a Featurization Job has been submitted, you can wait for it to complete using the arangoml.wait_for_featurization method:
# 3. Wait for the Featurization Job to complete

featurization_job_result = arangoml.wait_for_featurization(featurization_job.job_id)
Example Output:
{
  "job_id": "16349541",
  "output_db_name": "OPEN_INTELLIGENCE_ANGOLA",
  "graph": "OPEN_INTELLIGENCE_ANGOLA",
  "feature_set_id": "16349537",
  "feature_set_ids": [
      "16349537"
  ],
  "vertexCollections": {
      "Actor": {
          "x": "OPEN_INTELLIGENCE_ANGOLA_x"
      },
      "Class": {
          "x": "OPEN_INTELLIGENCE_ANGOLA_x"
      },
      "Country": {
          "x": "OPEN_INTELLIGENCE_ANGOLA_x"
      },
      "Event": {
          "x": "OPEN_INTELLIGENCE_ANGOLA_x",
          "y": "OPEN_INTELLIGENCE_ANGOLA_y"
      },
      "Source": {
          "x": "OPEN_INTELLIGENCE_ANGOLA_x"
      },
      "Location": {
          "x": "OPEN_INTELLIGENCE_ANGOLA_x"
      },
      "Region": {
          "x": "OPEN_INTELLIGENCE_ANGOLA_x"
      }
  },
  "edgeCollections": {
      "eventActor": {},
      "hasSource": {},
      "hasLocation": {},
      "inCountry": {},
      "inRegion": {},
      "subClass": {},
      "type": {}
  },
  "label_field": "OPEN_INTELLIGENCE_ANGOLA_y",
  "input_field": "OPEN_INTELLIGENCE_ANGOLA_x",
  "feature_set_id_to_results": {
      "16349537": {
          "feature_set_id": "16349537",
          "output_db_name": "OPEN_INTELLIGENCE_ANGOLA",
          "graph": "OPEN_INTELLIGENCE_ANGOLA",
          "vertexCollections": {
              "Actor": {
                  "x": "OPEN_INTELLIGENCE_ANGOLA_x"
              },
              "Class": {
                  "x": "OPEN_INTELLIGENCE_ANGOLA_x"
              },
              "Country": {
                  "x": "OPEN_INTELLIGENCE_ANGOLA_x"
              },
              "Event": {
                  "x": "OPEN_INTELLIGENCE_ANGOLA_x",
                  "y": "OPEN_INTELLIGENCE_ANGOLA_y"
              },
              "Source": {
                  "x": "OPEN_INTELLIGENCE_ANGOLA_x"
              },
              "Location": {
                  "x": "OPEN_INTELLIGENCE_ANGOLA_x"
              },
              "Region": {
                  "x": "OPEN_INTELLIGENCE_ANGOLA_x"
              }
          },
          "edgeCollections": {
              "eventActor": {},
              "hasSource": {},
              "hasLocation": {},
              "inCountry": {},
              "inRegion": {},
              "subClass": {},
              "type": {}
          },
          "label_field": "OPEN_INTELLIGENCE_ANGOLA_y",
          "input_field": "OPEN_INTELLIGENCE_ANGOLA_x",
          "is_feature_store": false,
          "target_collection": "Event"
      }
  },
  "is_feature_store": false,
  "target_collection": "Event"
}
You can also cancel a Featurization Job using the arangoml.jobs.cancel_job method:
arangoml.jobs.cancel_job(prediction_job.job_id)
Training
API Documentation: ArangoML.jobs.train
Training Graph Machine Learning Models with ArangoGraphML only requires two steps:
- Describe which data points should be included in the Training Job.
- Pass the Training Specification to the Training Service.
The Training Service depends on a Training Specification that contains:
featureSetID: The feature set ID that was generated during the Featurization Job (if any). It replaces the need to provide themetagraph,databaseName, andprojectNamefields.databaseName: The database name the source data is in. Can be omitted iffeatureSetIDis provided.projectName: The top-level project to which all the experiments will link back. Can be omitted iffeatureSetIDis provided.useFeatureStore: Boolean for enabling or disabling the use of the feature store. Default isfalse.mlSpec: Describes the desired machine learning task, input features, and the attribute label to be predicted.classification: Dictionary to describe the Node Classification Task Specification.targetCollection: The ArangoDB collection name that contains the prediction label.inputFeatures: The name of the feature to be used as input.labelField: The name of the attribute to be predicted.batchSize: The number of documents to process in a single batch. Default is64.
metagraph: Metadata to represent the vertex & edge collections of the graph. IffeatureSetIDis provided, this can be omitted.graph: The ArangoDB graph name.vertexCollections: A dictionary mapping the collection names to the following values:x: The name of the feature to be used as input.y: The name of the attribute to be predicted. Can only be specified for one collection.
edgeCollections: A dictionary mapping the edge collection names to an empty dictionary, as edge features are not currently supported.
A Training Specification allows for concisely defining your training task in a single object and then passing that object to the training service using the Python API client, as shown below.
The ArangoGraphML Training Service is responsible for training a series of Graph Machine Learning Models using the data provided in the Training Specification. It assumes that the data has been featurized and is ready to be used for training.
Given that we have run a Featurization Job, we can create the Training Specification using the featurization_job_result object returned from the Featurization Job:
# 1. Define the Training Specification

training_spec = {
    "featureSetID": featurization_job_result.result.feature_set_id,
    "mlSpec": {
        "classification": {
            "targetCollection": "Event",
            "inputFeatures": "OPEN_INTELLIGENCE_ANGOLA_x",
            "labelField": "OPEN_INTELLIGENCE_ANGOLA_y",
        }
    },
}
Once the specification has been defined, a Training Job can be triggered using the arangoml.jobs.train method:
# 2. Submit a Training Job

training_job = arangoml.jobs.train(training_spec)
Once a Training Job has been submitted, you can wait for it to complete using the arangoml.wait_for_training method:
# 3. Wait for the Training Job to complete

training_job_result = arangoml.wait_for_training(training_job.job_id)
Example Output:
{
  "job_id": "691ceb2f-1931-492a-b4eb-0536925a4697",
  "job_status": "COMPLETED",
  "project_name": "OPEN_INTELLIGENCE_ANGOLA_GraphML_Node_Classification",
  "project_id": "16832427",
  "database_name": "OPEN_INTELLIGENCE_ANGOLA",
  "metagraph": {
      "mlSpec": {
          "classification": {
              "targetCollection": "Event",
              "inputFeatures": "OPEN_INTELLIGENCE_ANGOLA_x",
              "labelField": "OPEN_INTELLIGENCE_ANGOLA_y",
              "metrics": None
          }
      },
      "graph": "OPEN_INTELLIGENCE_ANGOLA",
      "vertexCollections": {
          "Actor": {
              "x": "OPEN_INTELLIGENCE_ANGOLA_x"
          },
          "Class": {
              "x": "OPEN_INTELLIGENCE_ANGOLA_x"
          },
          "Country": {
              "x": "OPEN_INTELLIGENCE_ANGOLA_x"
          },
          "Event": {
              "x": "OPEN_INTELLIGENCE_ANGOLA_x",
              "y": "OPEN_INTELLIGENCE_ANGOLA_y"
          },
          "Source": {
              "x": "OPEN_INTELLIGENCE_ANGOLA_x"
          },
          "Location": {
              "x": "OPEN_INTELLIGENCE_ANGOLA_x"
          },
          "Region": {
              "x": "OPEN_INTELLIGENCE_ANGOLA_x"
          }
      },
      "edgeCollections": {
          "eventActor": {},
          "hasSource": {},
          "hasLocation": {},
          "inCountry": {},
          "inRegion": {},
          "subClass": {},
          "type": {}
      },
      "batch_size": 64
  },
  "time_submitted": "2024-01-12T02:19:19.686286",
  "time_started": "2024-01-12T02:19:29.403742",
  "time_ended": "2024-01-12T02:30:59.313038",
  "job_state": None,
  "job_conditions": None
}
You can also cancel a Training Job using the arangoml.jobs.cancel_job method:
arangoml.jobs.cancel_job(training_job.job_id)
Model Selection
Model Statistics can be observed upon completion of a Training Job. To select a Model, the ArangoGraphML Projects Service can be used to gather all relevant models and choose the preferred model for a Prediction Job.
First, let’s list all the trained models using ArangoML.list_models :
# 1. List all trained Models

models = arangoml.list_models(
  project_name=project.name,
  training_job_id=training_job.job_id
)

print(len(models))
The cell below selects the model with the highest test accuracy using ArangoML.get_best_model , but there may be other factors that motivate you to choose another model. See the model_statistics in the output field below for more information on the full list of available metrics.
best_model = arangoml.get_best_model(
    project.name,
    training_job.job_id,
    sort_parent_key="test",
    sort_child_key="accuracy",
)

print(best_model)
Example Output:
{
  "job_id": "691ceb2f-1931-492a-b4eb-0536925a4697",
  "model_id": "02297435-3394-4e7e-aaac-82e1d224f85c",
  "model_statistics": {
      "_id": "devperf/123",
      "_key": "123",
      "_rev": "_gkUc8By--_",
      "run_id": "123",
      "test": {
          "accuracy": 0.8891242216547955,
          "confusion_matrix": [[13271, 2092], [1276, 5684]],
          "f1": 0.9,
          "loss": 0.1,
          "precision": 0.9,
          "recall": 0.8,
          "roc_auc": 0.8,
      },
      "validation": {
          "accuracy": 0.9,
          "confusion_matrix": [[13271, 2092], [1276, 5684]],
          "f1": 0.85,
          "loss": 0.1,
          "precision": 0.86,
          "recall": 0.85,
          "roc_auc": 0.85,
      },
  },
  "target_collection": "Event",
  "target_field": "label",
}
Prediction
API Documentation: ArangoML.jobs.predict
Final step!
After selecting a model, a Prediction Job can be created. The Prediction Job will generate predictions and persist them to the source graph in a new collection, or within the source documents.
The Prediction Service depends on a Prediction Specification that contains:
projectName: The top-level project to which all the experiments will link back.databaseName: The database name the source data is in.modelID: The model ID to use for generating predictions.featurizeNewDocuments: Boolean for enabling or disabling the featurization of new documents. Useful if you don’t want to re-train the model upon new data. Default isfalse.featurizeOutdatedDocuments: Boolean for enabling or disabling the featurization of outdated documents. Outdated documents are those whose features have changed since the last featurization. Default isfalse.schedule: A cron expression to schedule the prediction job (e.g0 0 * * *for daily predictions). Default isNone.
# 1. Define the Prediction Specification

prediction_spec = {
  "projectName": project.name,
  "databaseName": dataset_db.name,
  "modelID": best_model.model_id,
}
This job updates all documents with the predictions derived from the trained model.
Once the specification has been defined, a Prediction Job can be triggered using the arangoml.jobs.predict method:
# 2. Submit a Prediction Job
prediction_job = arangoml.jobs.predict(prediction_spec)
Similar to the Training Service, we can wait for a Prediction Job to complete with the arangoml.wait_for_prediction method:
# 3. Wait for the Prediction Job to complete

prediction_job_result = arangoml.wait_for_prediction(prediction_job.job_id)
Example Output:
{
  "job_id": "b2a422bb-5650-4fbc-ba6b-0578af0049d9",
  "job_status": "COMPLETED",
  "project_name": "OPEN_INTELLIGENCE_ANGOLA_GraphML_Node_Classification",
  "project_id": "16832427",
  "database_name": "OPEN_INTELLIGENCE_ANGOLA",
  "model_id": "1a365657-f5ed-4da9-948b-1ff60bc6e7de",
  "job_state_information": {
      "outputGraphName": "OPEN_INTELLIGENCE_ANGOLA",
      "outputCollectionName": "Event",
      "outputAttribute": "OPEN_INTELLIGENCE_ANGOLA_y_predicted",
      "numberOfPredictedDocuments": 3302,
      "outputEdgeCollectionName": None
  },
  "time_submitted": "2024-01-12T02:31:18.382625",
  "time_started": "2024-01-12T02:31:23.550469",
  "time_ended": "2024-01-12T02:31:40.021035"
}
You can also cancel a Prediction Job using the arangoml.jobs.cancel_job method:
arangoml.jobs.cancel_job(prediction_job.job_id)
Viewing Predictions
We can now access our predictions via AQL:
import json

collection_name = prediction_job_result.job_state_information['outputCollectionName']

query = f"""
  FOR doc IN `{collection_name}`
    SORT RAND()
    LIMIT 3
    RETURN doc
"""

docs = list(dataset_db.aql.execute(query))

print(json.dumps(docs, indent=2))