ArangoDB v3.13 is under development and not released yet. This documentation is not final and potentially incomplete.
Get started with the ArangoGraph API and Oasisctl
A tutorial that guides you through the ArangoGraph API as well as the Oasisctl command-line tool
This tutorial shows you how to do the following:
- Generate an API key and authenticate with Oasisctl
- View information related to your organizations, projects, and deployments
- Configure, create and delete a deployment
With Oasisctl the general command structure is to execute commands such as:
oasisctl list deployments
This command lists all deployments available to the authenticated user and we
will explore it in more detail later. Most commands also have associated
--flags that are required or provide additional options, this aligns with the
interaction method for many command line utilities. If you aren’t already
familiar with this, follow along as there are many examples in this guide that
will familiarize you with this command structure and using flags, along with
how to use OasisCtl to access the ArangoGraph API.
Note: A good rule of thumb for all variables, resource names, and identifiers is to assume they are all case sensitive, when being used with Oasisctl.
API Authentication
Generating an API Key
The first step to using the ArangoGraph API is to generate an API key. To generate a key you will need to be signed into your account at dashboard.arangodb.cloud . Once you are signed in, hover over the profile icon in the top right corner.
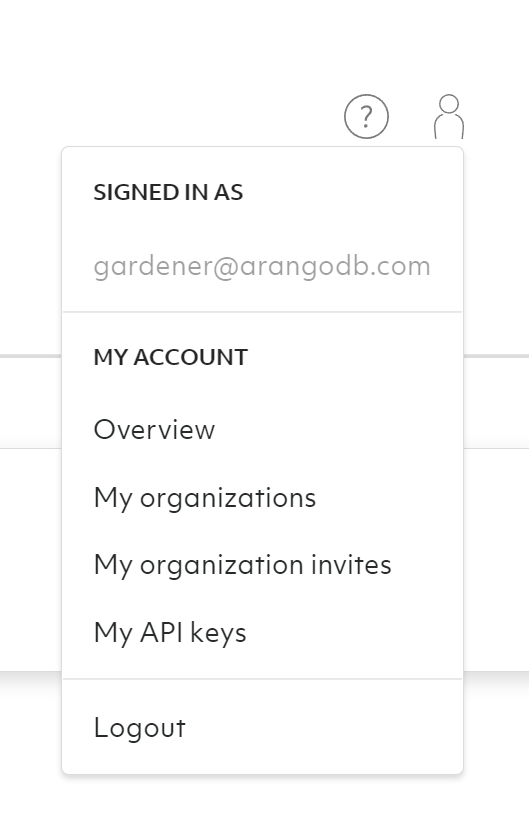
Click My API keys.
This will bring you to your API key management screen. From this screen you can create, reject, and delete API keys.
Click the New API key button.
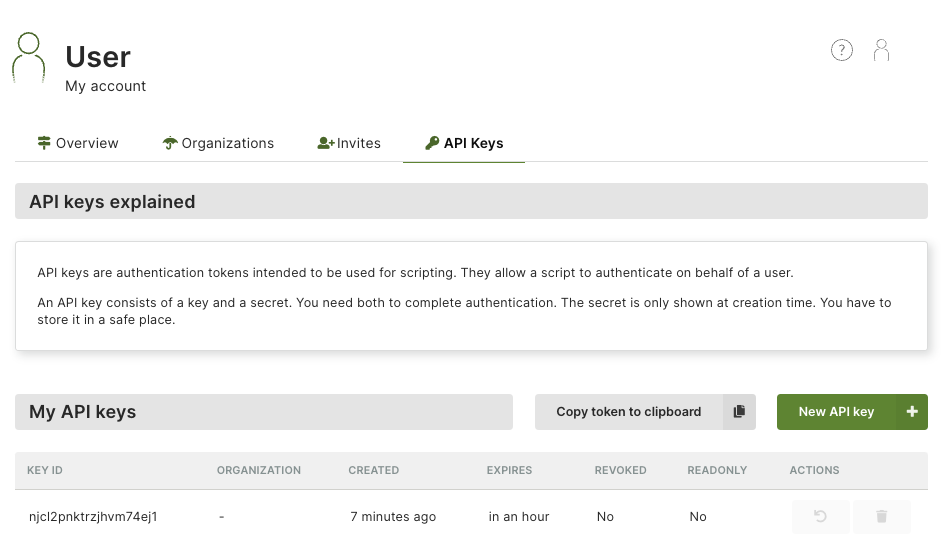
The pop-up box that follows has a few options for customizing the access level of this API key.
The options you have available include:
- Limit access to 1 organization or all organizations this user has access to
- Set an expiration time, specified in number of hours
- Limit key to read-only access
Once you have configured the API key access options, you will be presented with your API key ID and API key secret. It is very important that you capture the API key secret before clicking the close button. There is no way to retrieve the API key secret after closing this pop-up window.
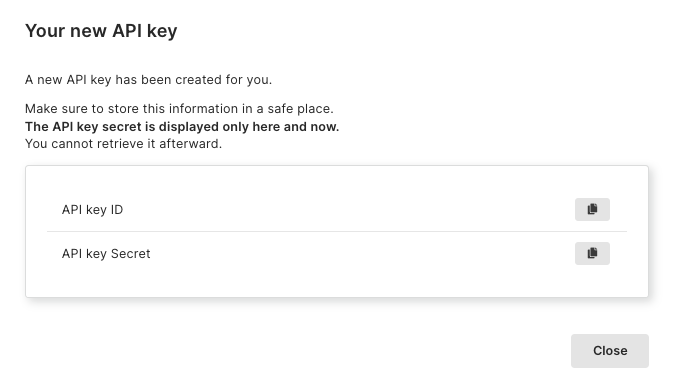
Once you have securely stored your API key ID and secret, click close.
That is all there is to setting up API access to your ArangoGraph organizations.
Authenticating with Oasisctl
Now that you have API access it is time to login with Oasisctl.
Running the Oasisctl utility without any arguments is the equivalent of including the --help flag. This shows all of the top level commands available and you can continue exploring each command by typing the command name followed by the --help flag to see the options available for that command.
Let’s start with doing that for the login command:
oasisctl login --help
You should see an output similar to this:
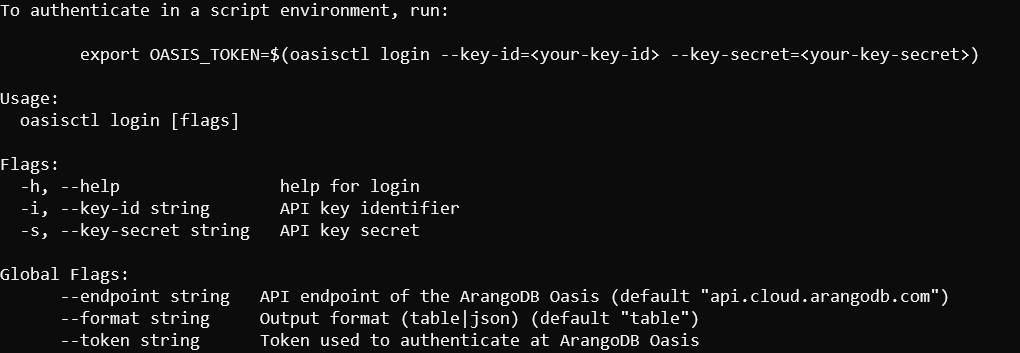
This shows two additional flags are available, aside from the help flag.
--key-id--key-secret
These require the values we received when creating the API key. Once you run this command you will receive an authentication token that can be used for the remainder of the session.
oasisctl login \
  --key-id cncApiKeyId \
  --key-secret 873-secret-key-id
Upon successful login you should receive an authentication token:

Depending on your environment, you could instead store this token for easier access. For example:
With Linux:
export OASIS_TOKEN=$(oasisctl login --key-id cncApiKeyId --key-secret 873-secret-key-id)
Or Windows Powershell:
setx OASIS_TOKEN (oasisctl login --key-id cncApiKeyId --key-secret 873-secret-key-id)
In the coming sections you will see how to authenticate with this token when using other commands that require authentication.
Viewing and Managing Organizations and Deployments
Format
This section covers the basics of retrieving information from the ArangoGraph API. Depending on the data you are requesting from the ArangoGraph API, being able to read it in the command line can start to become difficult. To make text easier to read for humans and your applications, Oasisctl offers two options for formatting the data received:
- Table
- JSON
You can define the format of the data by supplying the --format flag along
with your preferred format, like so:
oasisctl --format json
Viewing Information with the List Command
This section will cover the two main functions of retrieving data with the ArangoGraph API. These are:
list- List resourcesget- Get information
Before you can jump right into making new deployments you need to be aware of what resources you have available. This is where the list command comes in. List serves as a way to retrieve general information, you can see all of the available list options by accessing its help output.
oasisctl list --help
This should output a screen similar to:
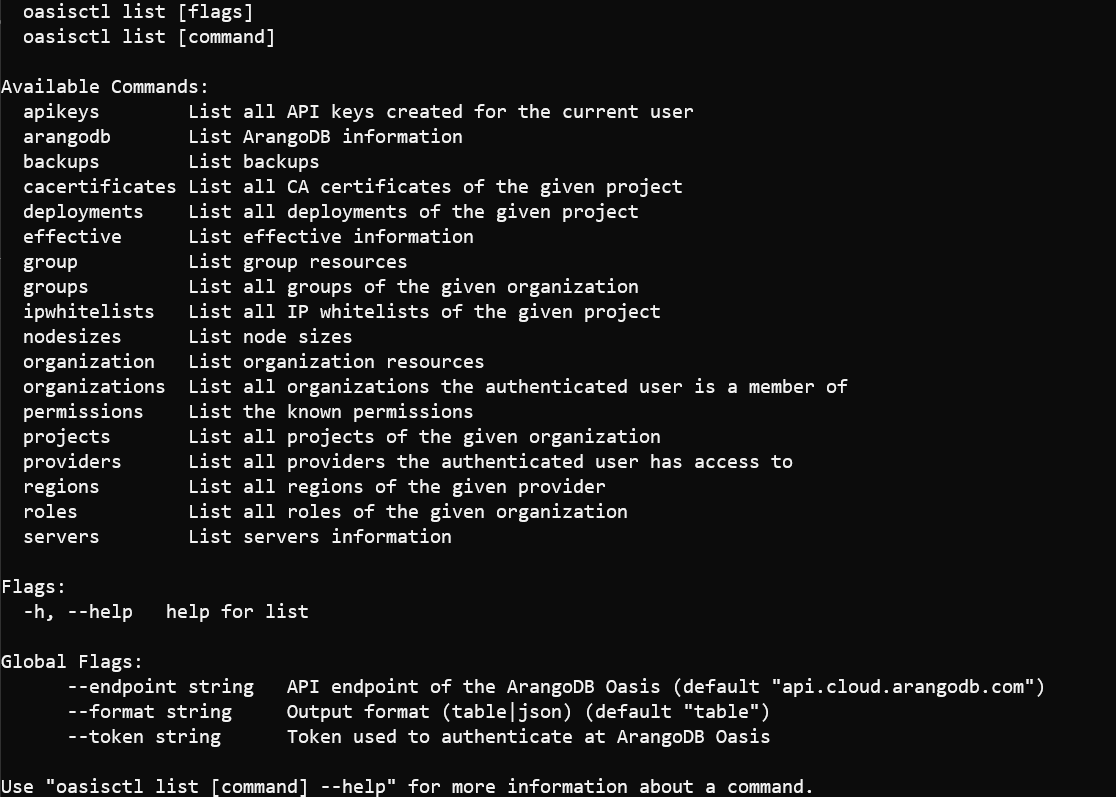
As you can see you can get information on anything you would need about your ArangoGraph organizations, deployments, and access control. To start, let’s take a look at a few examples of listing information and then getting more details on our results.
List Organizations
One of the first pieces of information you may be interested in is the organizations you have access to. This is useful to know because most commands require an explicit declaration of the organization you are interacting with. To find this, use list to list your available organizations:
oasisctl list organizations --format json
Once you have your available organizations you can refer to your desired organization using its name or id.
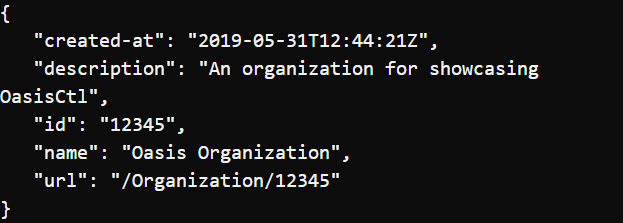
Note: You may also notice the url attribute, this is for internal use only and should not be treated as a publicly accessible path.
List Projects
Once you have the organization name that you wish to interact with, the next
step is to list the available projects within that organization. Do this by
following the same command structure as before and instead exchange
organizations for projects, this time providing the desired organization name
with the --organization-id flag.
oasisctl list projects \
  --organization-id "ArangoGraph Organization" \
  --format json
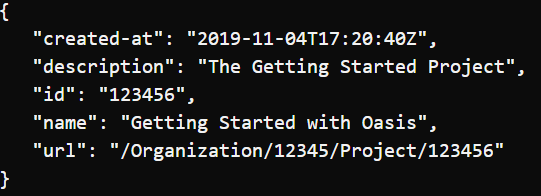
This will return information on all projects that the authenticated user has access to.
List Deployments
Things start getting a bit more interesting with information related to deployments. Now that you have obtained an organization iD and a project ID, you can list all of the associated deployments for that project.
oasisctl list deployments \
  --organization-id "ArangoGraph Organization" \
  --project-id "Getting Started with ArangoGraph" \
  --format json
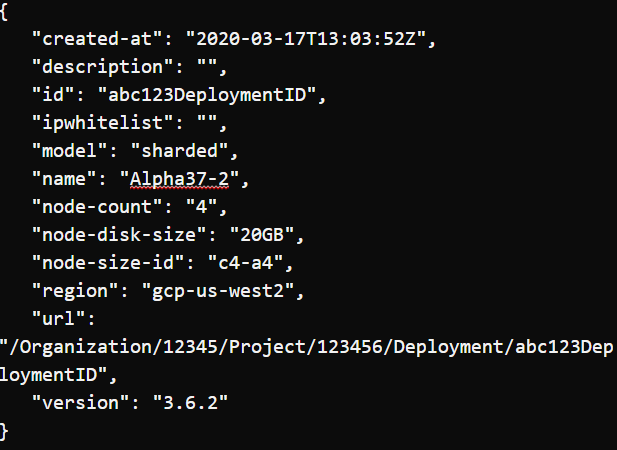
This provides some basic details for all of the deployments associated with the
project. Namely, it provides a deployment ID which we can use to start making
modifications to the deployment or to get more detailed information, with the
get command.
Using the Get Command
In Oasisctl, you use the get command to obtain more detailed information about any of your available resources. It follows the same command structure as the previous commands but typically requires a bit more information. For example, to get more information on a specific deployment means you need to know at least:
- Organization ID
- Project ID
- Deployment ID
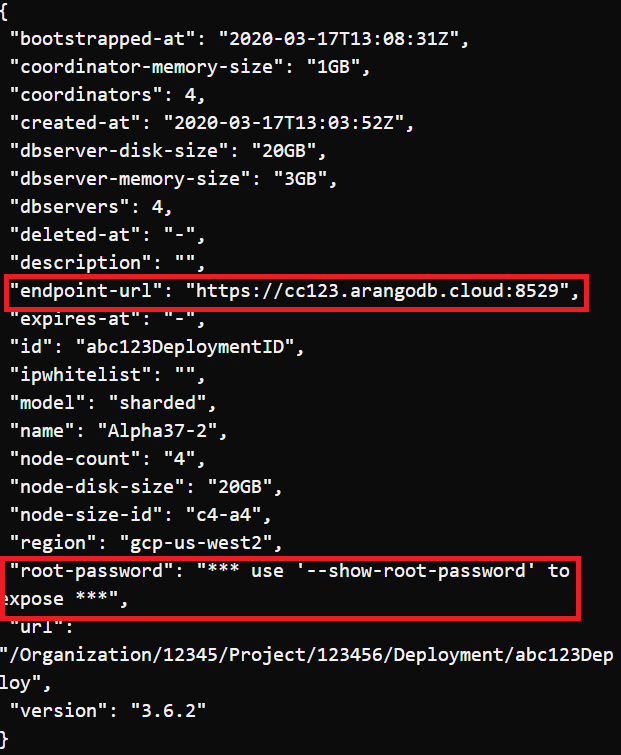
To get more information about our example deployment we would need to execute the following command:
oasisctl get deployment \
  --organization-id "ArangoGraph Organization" \
  --project-id "Getting Started with ArangoGraph" \
  --deployment-id "abc123DeploymentID" \
  --format json
This returns quite a bit more information about the deployment including more detailed server information, the endpoint URL where you can access the web interface, and optionally the root user password.
Node Size ID
We won’t be exploring every flag available for creating a deployment but it is
a good idea to explore the concept of the node size ID value. This is an
indicator that is unique to each provider (Google, AWS) and indicates
the CPU and memory. Depending on the provider and region this can also
determine the available disk sizes for your deployment. In other words, it is
pretty important to know which node-size-id your deployment will be using.
The command you execute will determine on the available providers and regions for your organization but here is an example command that lists the available options in the US West region for the Google Cloud Platform:
oasisctl list nodesizes \
  --organization-id "ArangoGraph Organization" \
  --provider-id "Google Cloud Platform" \
  --region-id gcp-us-west2
The output you will see will be similar to this:

It is important to note that you can scale up with more disk size but you are unable to scale down your deployment disk size. The only way to revert back to a lower disk size is to destroy and recreate your deployment.
Once you have decided what your starting deployment needs are you can reference your decision with the Id value for the corresponding configuration. So, for our example, we will be choosing the c4-a4 configuration. The availability and options are different for each provider and region, so be sure to confirm the node size options before creating a new deployment.
Challenge
You can use this combination of listing and getting to obtain all of the
information you want for your ArangoGraph organizations. We only explored a few of
the commands available but you can explore them all within the utility by
utilizing the --help flag or you can see all of the available options
in the documentation.
Something that might be useful practice before moving on is getting the rest of the information that you need to create a deployment. Here are a list of items that won’t have defaults available when you attempt to create your first deployment and you will need to supply:
- CA Certificate ID (name)
- IP Allowlist ID (id) (optional)
- Node Size ID (id)
- Node Disk Size (GB disk size dependent on Node Size ID)
- Organization ID (name)
- Project ID (name)
- Region ID (name)
Try looking up that information to get more familiar with how to find
information with Oasisctl. When in doubt use the --help flag with any
command.
Creating Resources
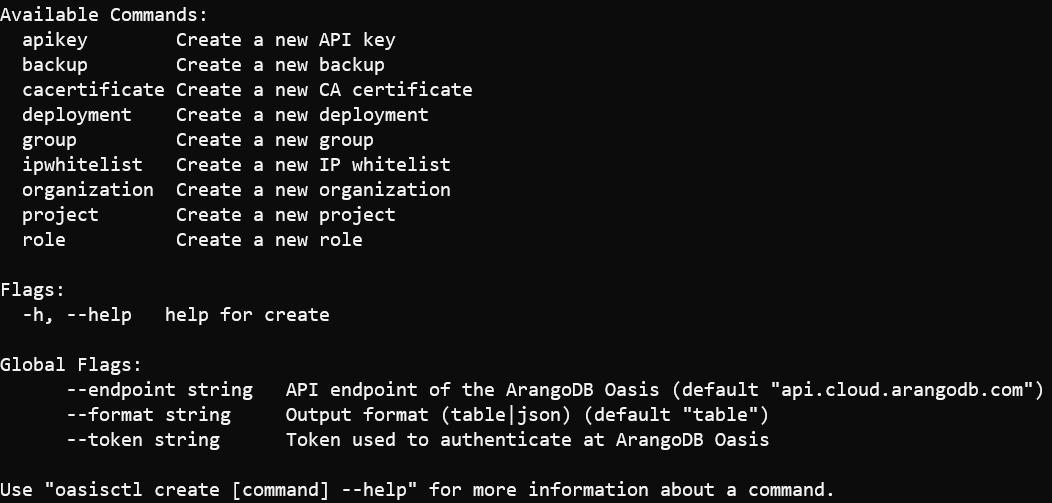
Now that you have seen how to obtain information about your available resources, it’s time to start using those skills to start creating your own deployment. To create resources with Oasisctl you use the create command. To see all the possible options you can start with the following command:
oasisctl create --help
Create a Deployment
To take a look at all of the options available when creating a deployment the best place to start is with our trusty help command.
oasisctl create deployment --help
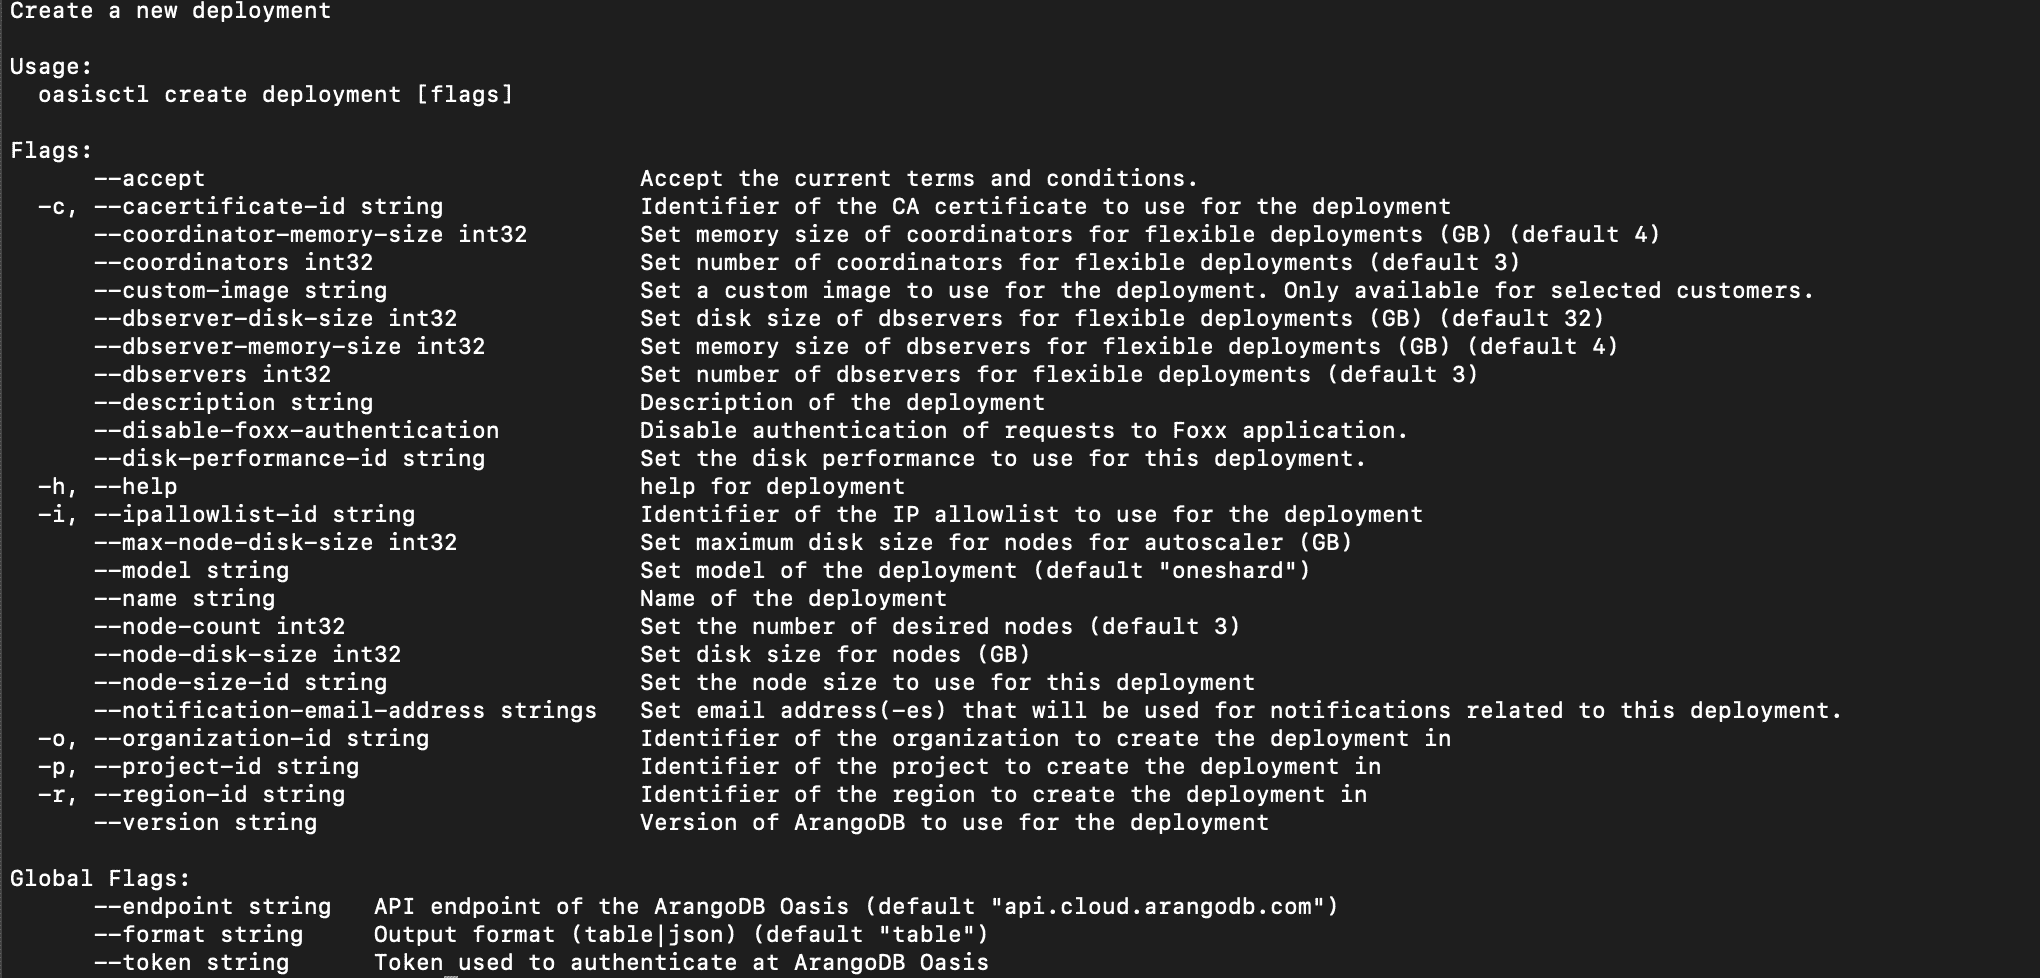
As you can see there are a lot of default options but also a few that require some knowledge of our pre-existing resources. Attempting to create a deployment without one of the required options will return an error indicating which value is missing or invalid.
Once you have collected all of the necessary information the command for creating a deployment is simply supplying the values along with the appropriate flags. This command will create a deployment:
oasisctl create deployment \
  --region-id gcp-us-west2 \
  --node-size-id c4-a4 \
  --node-disk-size 10 \
  --version 3.9.2 \
  --cacertificate-id OasisCert \
  --organization-id "ArangoGraph Organization" \
  --project-id "Getting Started with ArangoGraph" \
  --name "First Oasisctl Deployment" \
  --description "The first deployment created using the awesome Oasisctl utility!"
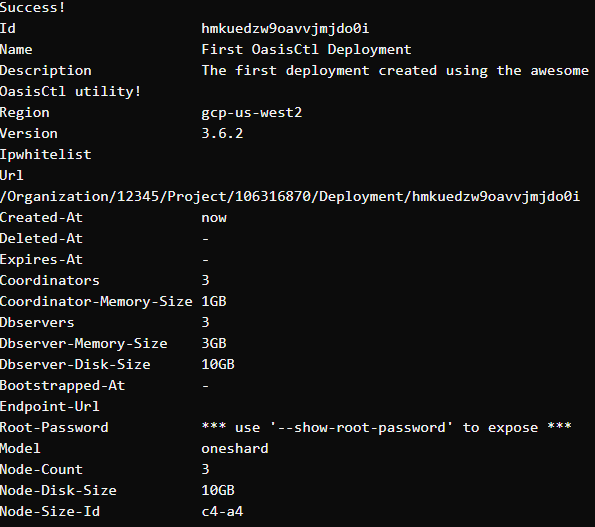
If everything went according to play you should see similar output:
Wait on Deployment Status
When you create a deployment it begins the process of bootstrapping which is getting the deployment ready for use. This should happen quickly and to see if it is ready for use you can run the wait command using the ID of the newly created deployment, shown at the top of the information you received above.
oasisctl wait deployment \
  --deployment-id hmkuedzw9oavvjmjdo0i
Once you receive a response of Deployment Ready, your deployment is indeed ready to use. You can get some new details by running the get command.
oasisctl get deployment \
  --organization-id "ArangoGraph Organization" \
  --deployment-id hmkuedzw9oavvjmjdo0i
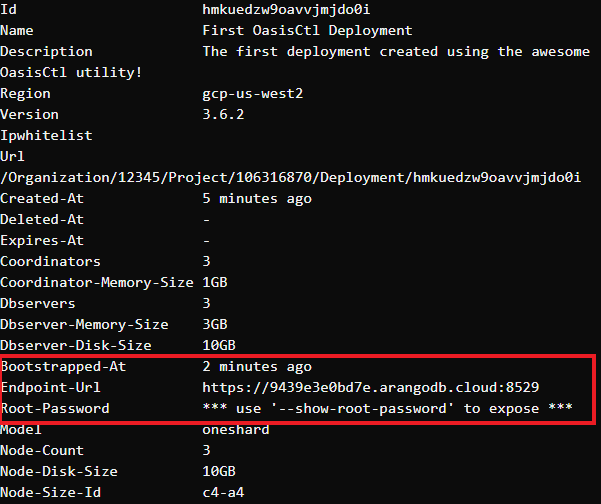
Once the deployment is ready you will get two new pieces of information, the
endpoint URL and Bootstrapped-At will indicate the time it became available.
If you would like to login to the web interface to verify that your server is in fact
up and running you will need to supply the --show-root-password flag along
with the get command, this flag does not take a value.
The Update Command
The inevitable time comes when something about your deployment must change and this is where the update command comes in. You can use update to change or update a number of things including updating the groups, policies, and roles for user access control. You can also update some of your deployment information or, for our situation, add an IP Allowlist if you didn’t add one during creation.
There are, of course, many options available and it is always recommended to start with the --help flag to read about all of them.
Update a Deployment
This section will show an example of how to update a deployment to use a pre-existing allowlist. To add an IP Allowlist after the fact we are really just updating the IP Allowlist value, which is currently empty. In order to update the IP Allowlist of a deployment you must create a allowlist and then you can simply reference its id like so:
oasisctl update deployment \
  --deployment-id hmkuedzw9oavvjmjdo0i \
  --ipallowlist-id abc123AllowlistID
You should receive a response with the deployment information and an indication that deployment was updated at the top.
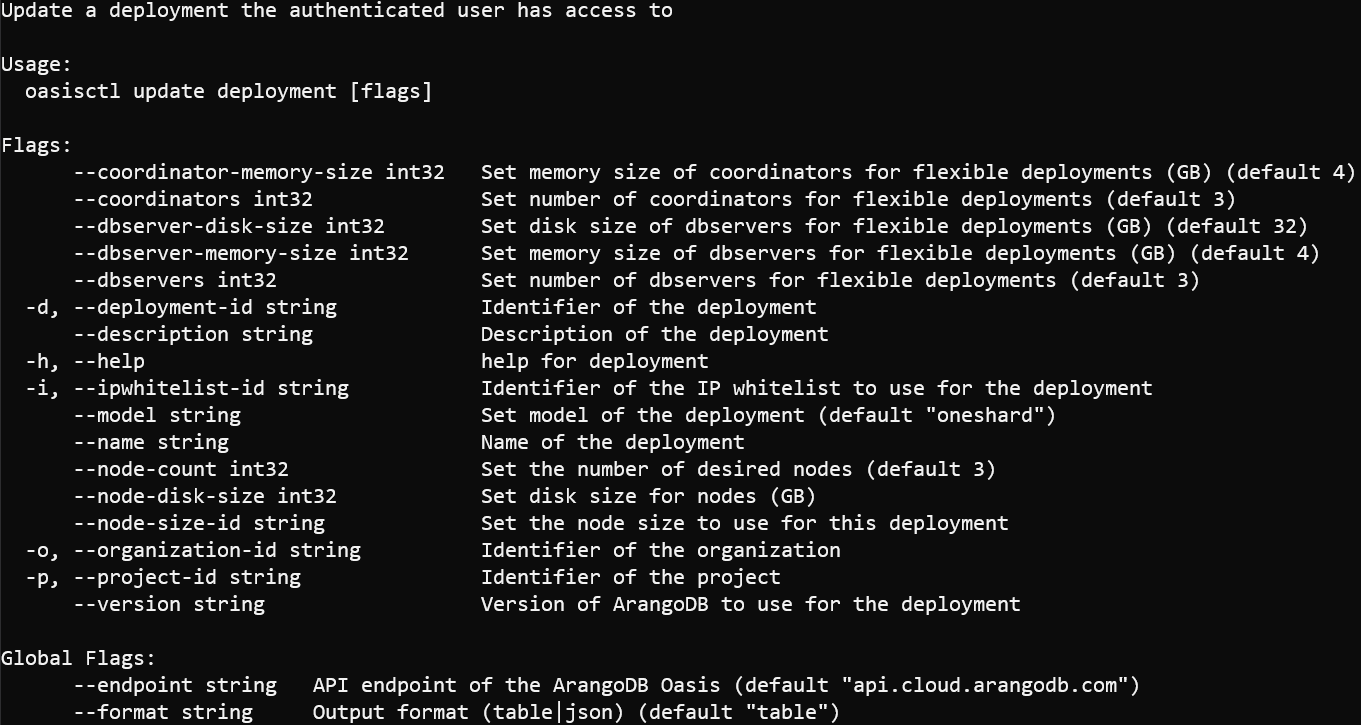
You can use the update command to update everything about your deployments as well. If you run:
oasisctl update deployment --help
You will see the full list of options available that will allow you to scale your deployment as needed.
Delete a Deployment
There may come a day where you need to delete a resource. The process for this follows right along with the conventions for the other commands detailed throughout this guide.
The Delete Command
For the final example in this guide we will delete the deployment that has been created. This only requires the deployment ID and the permissions to delete the deployment.
oasisctl delete deployment \
  --deployment-id hmkuedzw9oavvjmjdo0i
Once the deployment has been deleted you can confirm it is gone by listing your deployments.
oasisctl list deployments \
  --organization-id "ArangoGraph Organization" \
  --format json
Next Steps
As promised, this guide covered the basics of using Oasisctl with the ArangoDB API. While we primarily focused on viewing and managing deployments there is also a lot more to explore, including:
- Organization Invites Management
- Backups
- API Key Management
- Certificate Management
- User Access Control
You can check out all these features and further details on the ones discussed in this guide in the documentation.
